Digital Scholarship Help

  • Get Started
    • Log In
    • Edit Profile
    • Add a Post >
      • Check Spelling/Grammar
      • Include Categories & Tags
      • Include Imagery
      • Include a Map
      • Include Links/Feeds/Embeds
      • Include Math, Charts, and Tables
  • Setup Your Site
    • First Steps >
      • 1. Get a Site
      • 2. Setup Your Site
    • Next Steps >
      • Menus
      • Plugins
      • Themes >
        • Theme Edits
      • Widgets
      • Jetpack Site Admin
    • Using Your Site >
      • Image Displays
      • Projects
      • Subsites
      • Restricting Page Access
      • Exporting Your Site
  • Share & Engage
    • Comments
    • Contacts
    • RSS Feeds
    • Press This
    • Social Media
    • Subscriptions
    • The WordPress Firehose
  • Learning Tools
    • Computer Platforms/Apps >
      • Concept Mapping
      • Flickr
      • Gephi
      • Twitter
      • Zotero
    • Mapping >
      • ArcGIS & QGIS
      • Creating Tours
      • Find Spatial Data via geo.lclark.edu
      • Georeferencing
      • GIS Datafile Hints
      • Google Mapping
      • Joining Data
    • Mobile Apps >
      • ArcGIS Apps
      • Fulcrum
      • Location-Aware Apps
      • PDF Maps
      • WordPress Mobile App
  • Some Examples
    • Effective Posts
    • Effective Sites
    • Effective Subsites
  • Get More Help
    • Get Support
    • DS Training & User Group
    • Training Outlines >
      • DS Training – Level 1 (Users)
      • DS Training – Level 2 (Admins)
      • DS Training – Level 3 (Network Admins)

Add a Post

Add a new post

Add New Post

Click image to expand

One of the most common ways you will contribute is via a post. In WordPress land, a post is time-based content (vs. a page). Below are technical hints; for guidance on writing effective posts, see here.

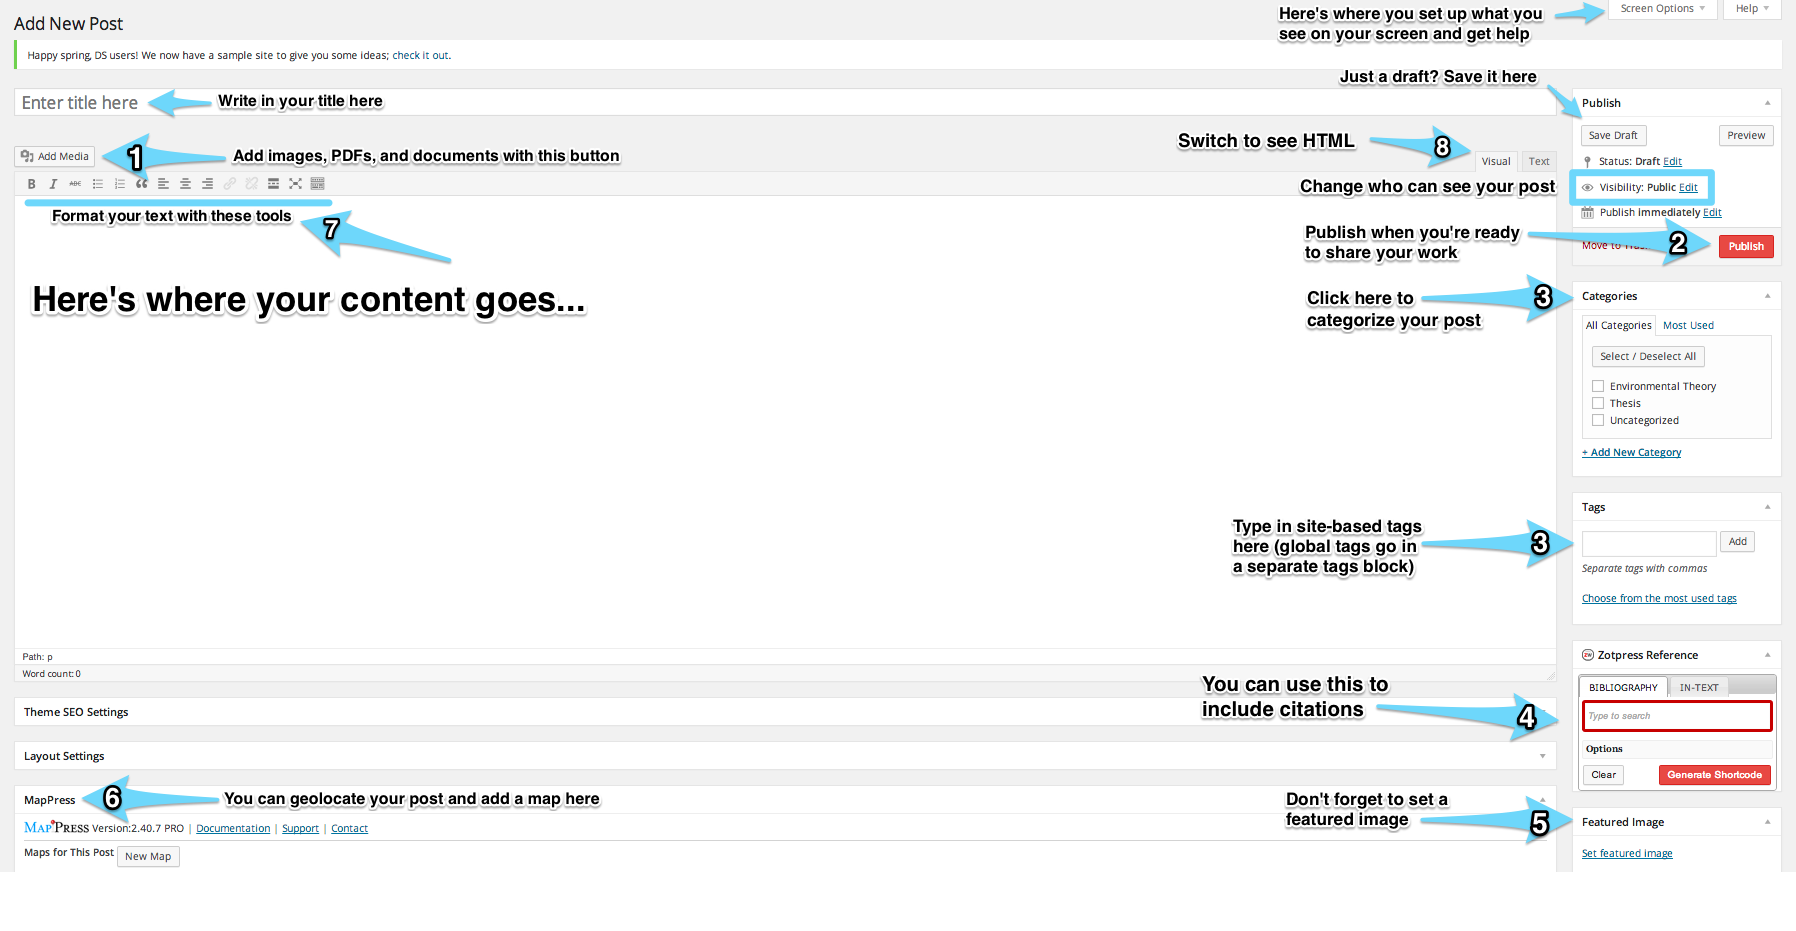
To start a new post, login, then click + New > Post on the admin bar at top or on your dashboard. You’ll see a posting window like the image at right. What you see on this window depends on how you’ve set your Screen Options at upper right; feel free to show or hide metaboxes as you wish. Here are some hints:

  1. The Add Media button is where you can upload an image or other file you’d like to attach to your post. See here for more information on adding media.
  2. The Publish metabox at upper right is where you save a draft, set the privacy of your post, etc.
  3. Categories and tags are two ways to organize your posts; here’s the official word on the difference. We’ll also use a special global tags box to share common posts across our multisite.
  4. The Zotpress widget helps you add citations or bibliographies into your post. You can also simply drag references from your Zotero library. Visit the Zotero help page for more info.
  5. We strongly recommend you add a Featured Image to help illustrate the content of your post. Make sure that the image you are using is not copyright protected!
  6. The MapPress metabox, which we also strongly recommend, lets you geolocate your post or add a map to it. Then you can view all your geolocated posts on a mashup map! See the the Include a Map help page for more information.
  7. You may want to format your text in a specific way. Use the toolbox above the post window.
  8. By clicking Text, you can see and edit the HTML code whereas Visual lets you see your post as is.

Important! Make sure to read these related help pages:

  • Check Spelling/Grammar
  • Include Categories & Tags
  • Include Imagery
  • Include a Map 
  • Include Links/Feeds/Embeds 
  • Include Math, Charts, & Tables

Digital Scholarship Multisite © 2018 · Lewis & Clark College · Log in