Click image to expand
Fulcrum is a robust field survey app. You design the survey online, download it by syncing onto one or more devices, administer the survey (with automatic geolocation), then upload results (by syncing again) for collation, data storage, and download in spreadsheet format for analysis, or various file formats for mapping. Before you proceed with the below, bear in mind that this help page is still in draft form and any input or recommendations are welcome. Also keep in mind standard research protocol, for instance, if you are using human participants in your survey, you may need to get clearance from the Institutional Research Board.
Design a survey
Click image to expand
- Navigate to the Fulcrum website and either sign in using account information that your instructor has given you or make your own. There is a free 30 day trial.
- In Fulcrum, each survey is called an app. You will either select an app from the list or your will click + New App. You will then have two choices; to Use an App from the Gallery or Design a New App. You may check to see if an app from the gallery will work, but most often you will need to design a new app.
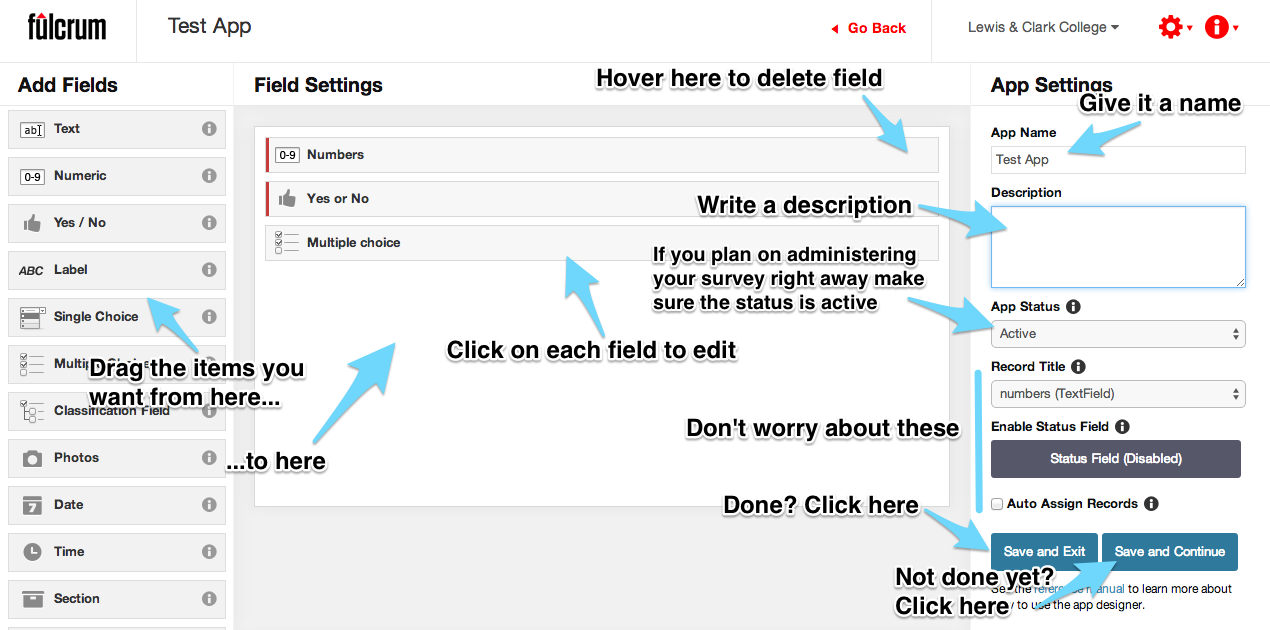
- From the + New App page, you will need to fill out the App Settings in the rightmost column.
- You need to decide what questions you want to ask and how they could be answered. For each question, drag the appropriate field type from the left column to your middle column. Keep in mind your end goal: e.g., if you plan to run statistics on this data, fields like Numeric, Single Choice, and Multiple Choice are best, though other fields may suit your needs as well. (Note also that fieldnames may need to be short depending on next steps; e.g., for eventual GIS analysis your fields need to be no more than 10 characters without spaces.)
- Once you drag the fields into the middle column, you may edit them to fit your survey’s needs and drag them into an appropriate order. You can also determine which fields are required, whether you wish to add error checking or branching logic, etc.; Fulcrum is very flexible!
- Once you finish click Save and Exit.
Add Custom Base Maps
Fulcrum has the capability to load custom base maps for your survey area, and store it on your mobile device in a tiled format so that internet connectivity is not an issue in the field. This can be done with free imagery and a free application called TileMill to generate an MBTiles format usable when offline. A comprehensive article about the process is provided by Fulcrum here.
Administer a survey
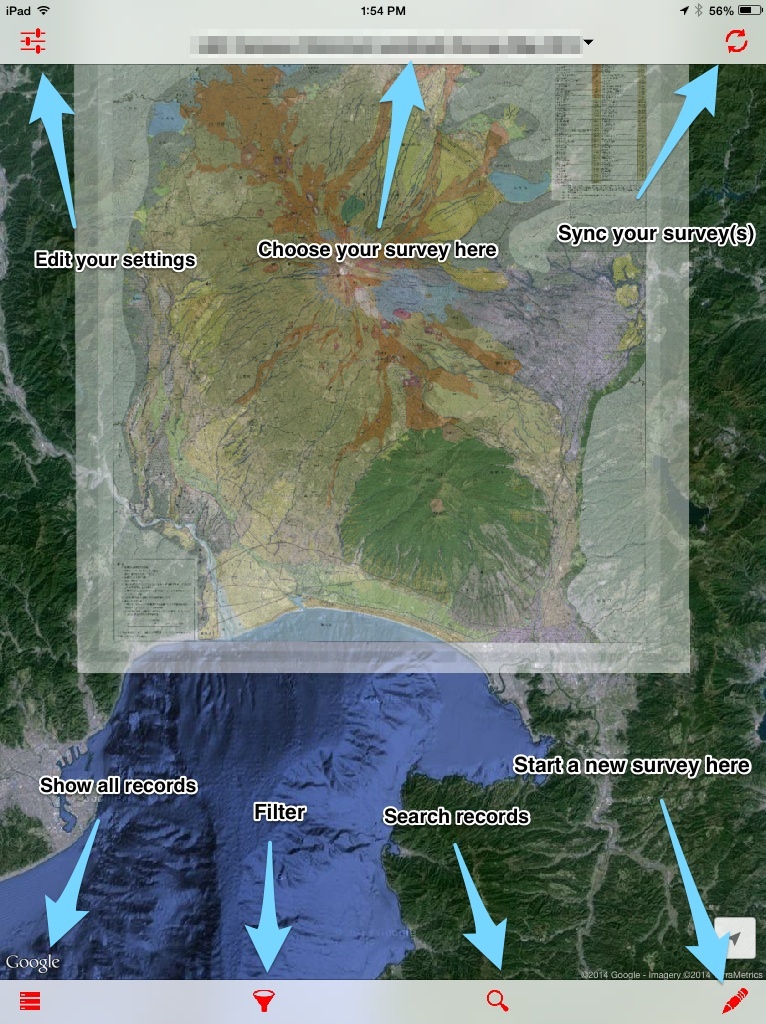
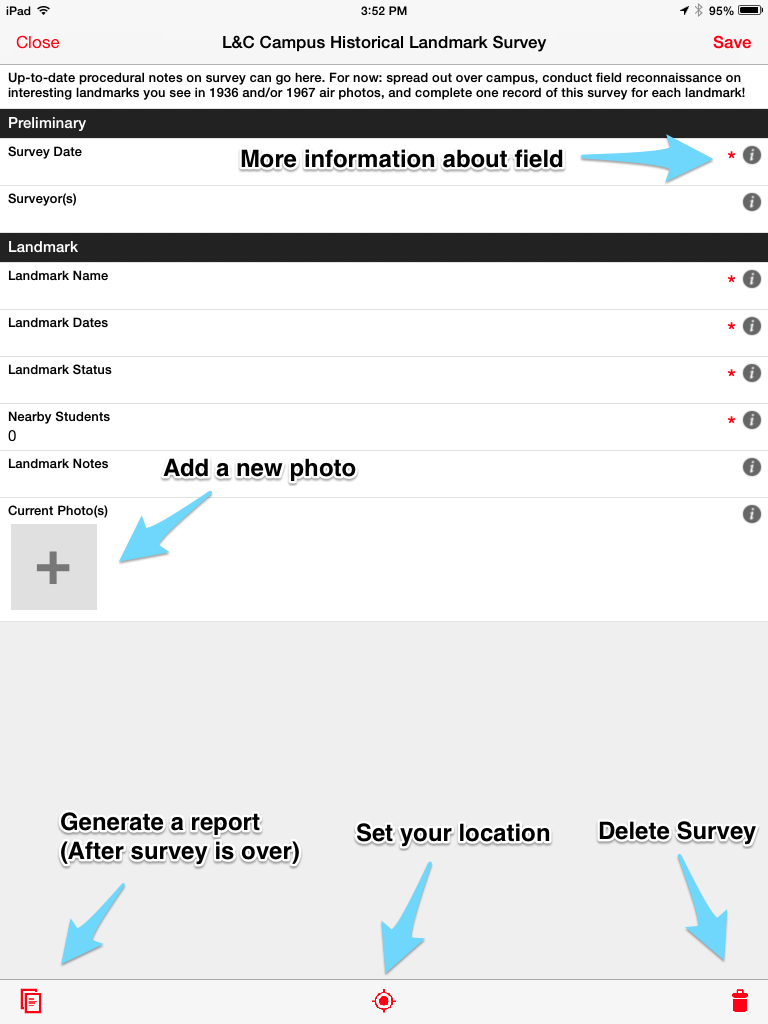
- If you have done everything above, you are ready to administer your survey. This can conveniently be done on whatever device has the free Fulcrum app.
- Grab your device, log in (using the same information as above), and if you don’t see your survey, click sync. If your survey still doesn’t sync, you may have to activate it on the Fulcrum website.
- Make sure your device is geolocating properly by completing a sample survey record. Before you add a record, make sure the translucent blue circle surrounding the solid blue circle has disappeared by waiting 15-20 seconds after launching Fulcrum to ensure accurate geolocation.
- See the images on the right (click to expand) for more help on navigating the Fulcrum interface.
- Make sure to sync periodically during your survey and after your finish.

Click image to expand
Export results
- Now that you are done with your survey, you probably want to do something with your data! On your computer browser, go to the Fulcrum website where your apps are listed and click Export (looks like an arrow inclosed in a circle) on the right.
- You have a few choices for which file format you want to export it to.
- For GIS, choose ESRI Shapefile (though your data often should be cleaned up first; if so, export as CSV).
- For SPSS or other analytic software, you will want the data in CSV.
- For Google Maps, choose KML.
- You will generally select Include Photos and Include GPS Data.
- Make sure the app you want is selected.
- Click Next.
- Review the settings for exporting and click Finish. The download may take some time.