Google Earth allows users to create map-based narrative tours that can be viewed in Google Earth or embedded on a webpage. You can provide a voiceover, fly from one location to another (or along a path), and show placemark info windows and even a supplemental image overlay basemap to convey your story. Viewers can pause to explore the tour area and pick up again when ready.
To take advantage of the advanced features that Google Earth offers, we recommend using the Record a Tour feature on Google Earth, with workflow documented below followed by information on how to share your completed tour. (One alternative is the Google Earth Tourbuilder site, which is more limited in features and sharing options but easy to use; Google Earth Tourbuilder tutorials can help you through the creation process.)
Recording a tour
To record a Google Earth tour, you should first ask: what map-based story do you want to tell? You can’t successfully navigate the technical choices below if you don’t have a general story idea in mind. Okay, here goes!
- Your tour can be based on locations (e.g., places where you took photos), or a route (e.g., where you went on a hike), or both. Location-based tours are more common, but Google Earth supports both.
- Now it’s time to gather all of your tour resources into an enclosing folder under My Places or Temporary Places:
- Location-based tour: If only a few locations/images, you can create a placemark for each, adding image links etc. to each. See here for Google Earth help on creating and editing placemarks. If many locations/images, we suggest you store geotagged photos in a Flickr album, then follow the Flickr Photo Tour section at bottom of the Flickr help page for converting to a KML; each photo location will be a placemark. It’s easiest if you delete placemarks you won’t use, then organize remaining placemarks to match tour order. For the easiest location-based tour, just save your enclosing folder as a KML, then share it with others, who can load it in Google Earth and click the Play Tour button to jump from placemark to placemark.
- Route-based tour: A route-based tour follows a Google Earth path; here’s help on how to create a path. If you wish to create a location-based tour that follows a specific route, make sure to click on that route to connect your locations as you define the path, then store your resultant path in the same folder where your placemarks are stored.
-
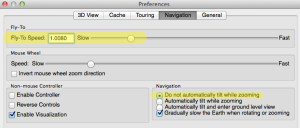
Click to enlarge
Tours use information you’ve set in Google Earth preferences to decide tilt and ground level view, and for the speed at which you move from one location to another. For instance, a fly-to speed around 1 and disabling of automatic tilt (see image at right) may be best for a small tour where vertical relief is not applicable. Experiment with these settings to get the best result.
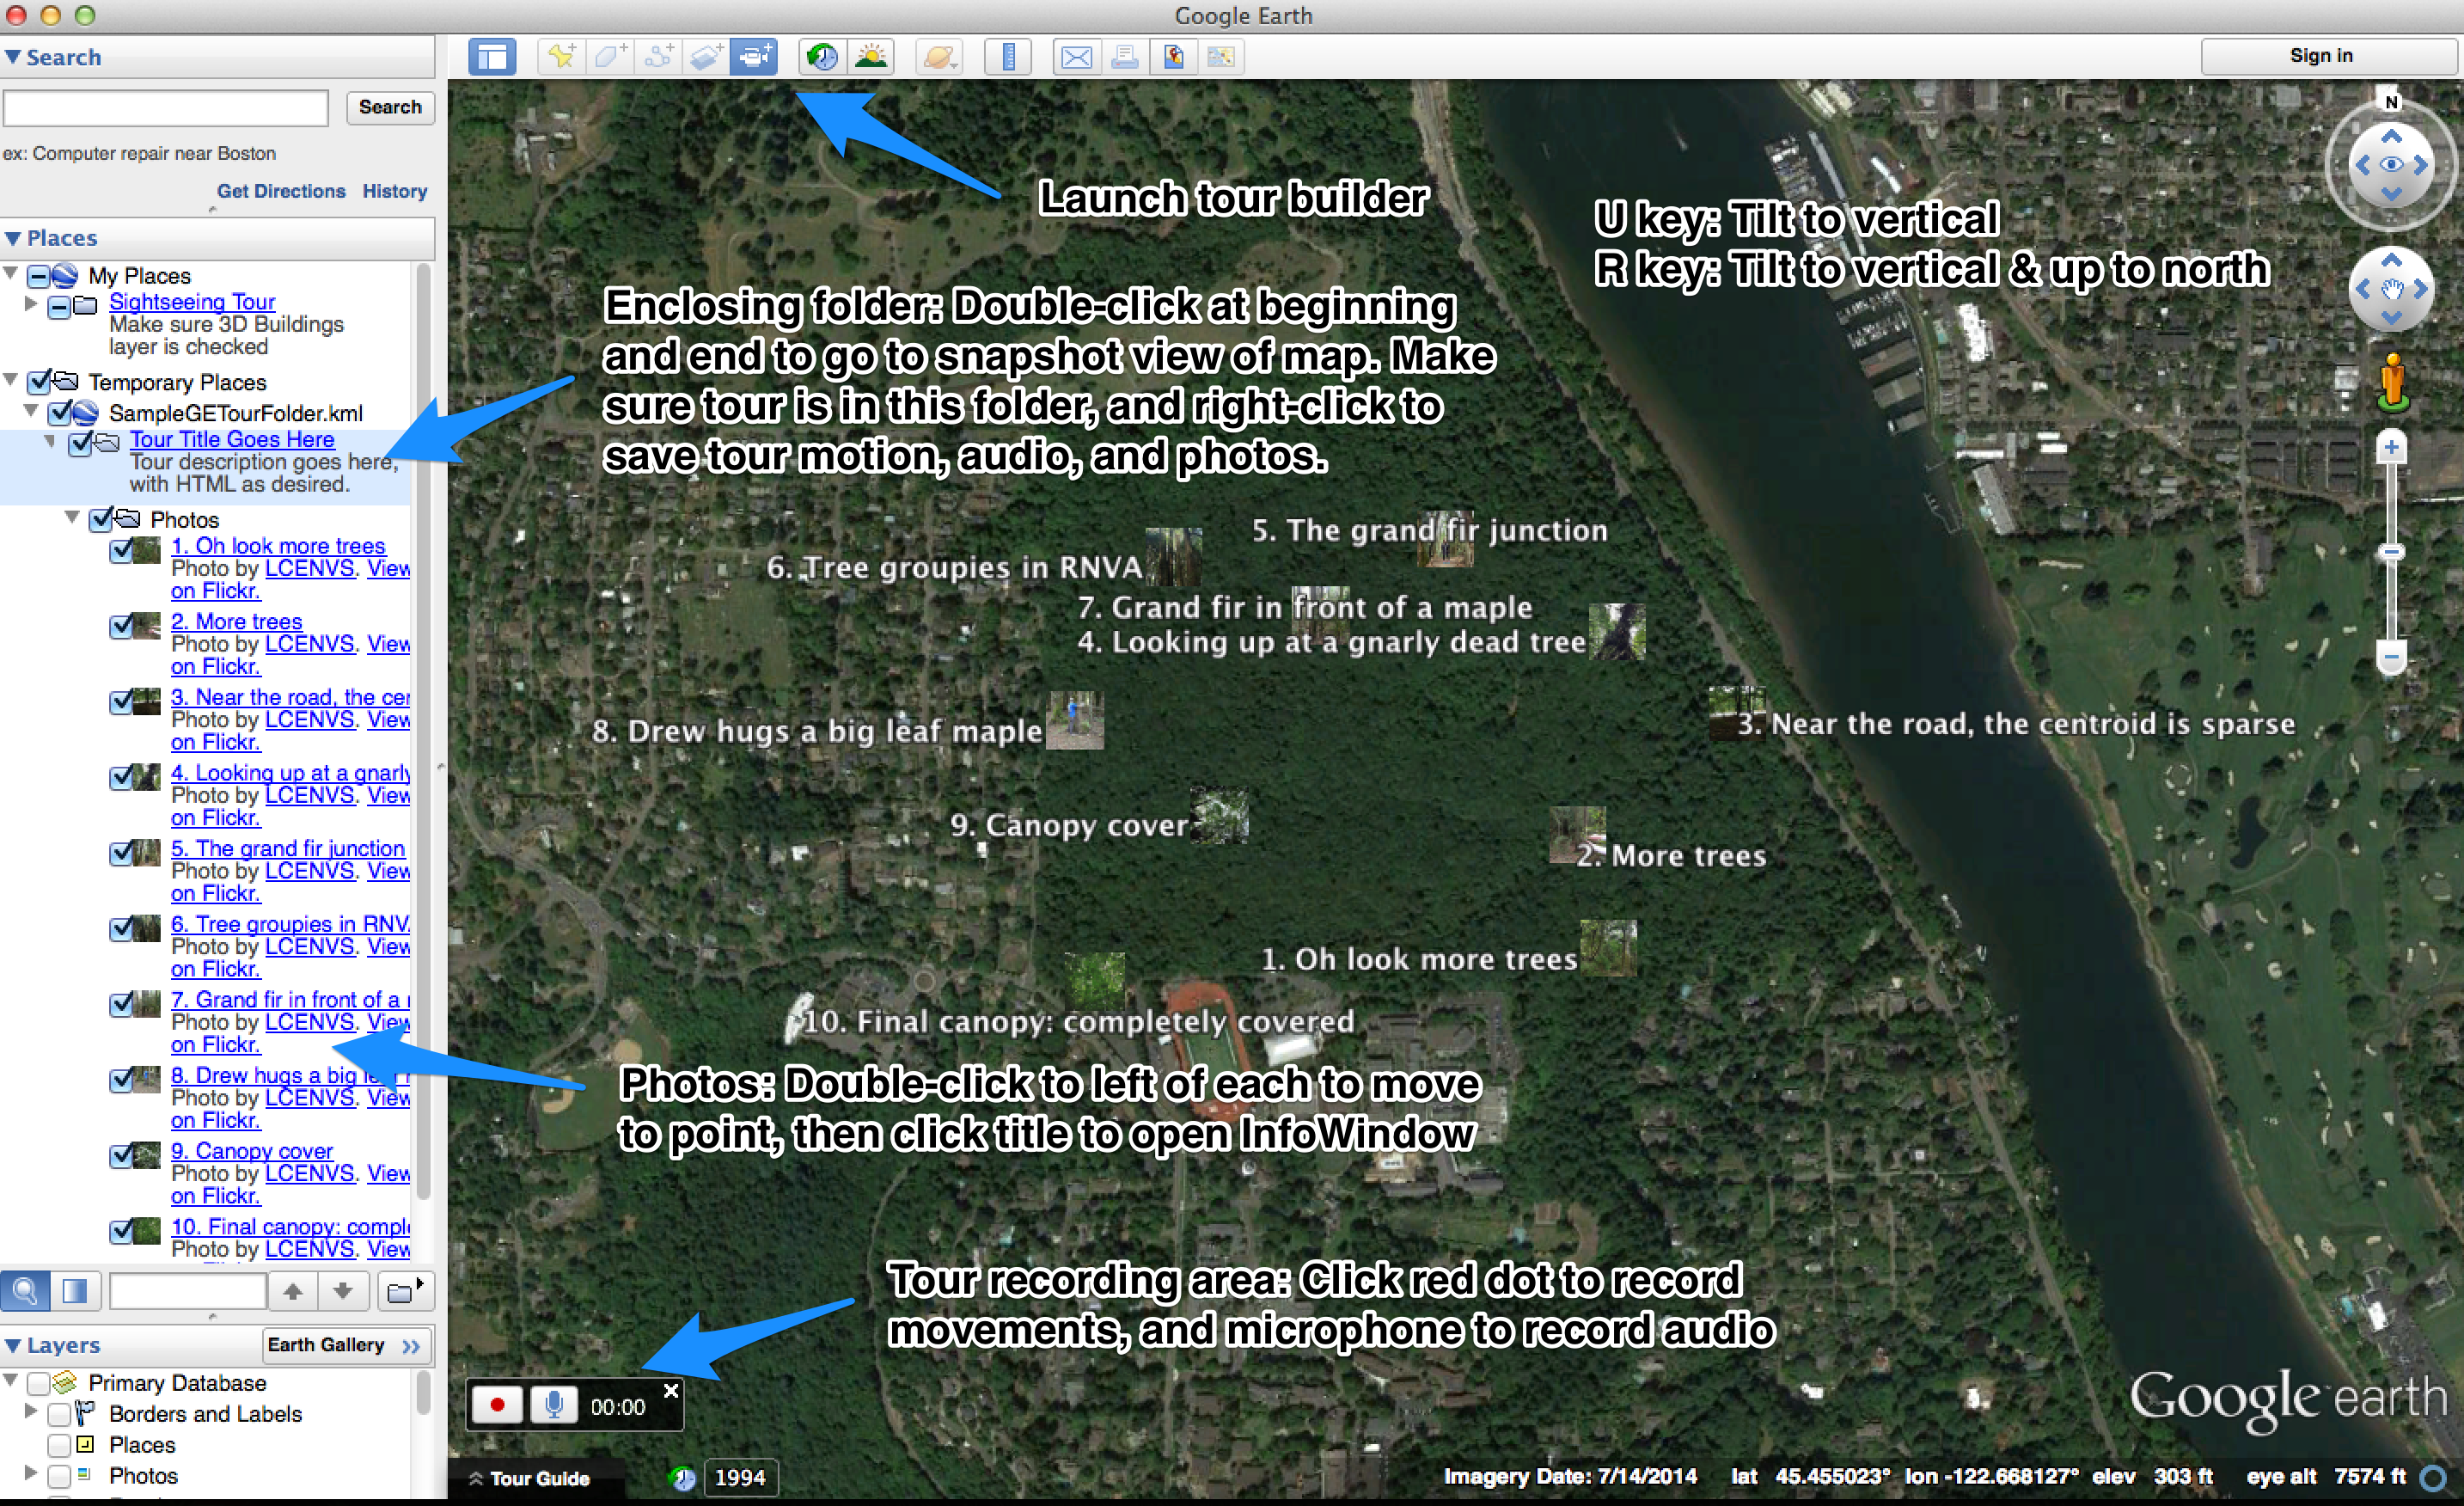
- It’s helpful to the viewer if you provide an overview map of your tour, so assuming your placemarks and/or path are relatively close together on the globe, create a snapshot view of all of them. To do this, click on the common enclosing folder, zoom and pan until all placemarks in the folder and/or the entire path can be viewed, then select Edit > Snapshot View. You can click the U key so you’re directly above prior to setting snapshot view.
- Time to create your tour! Here is a good help page to get you started, and here’s a recommended workflow:
-

Click for larger image
Select your enclosing folder (double-click on it if necessary to restore the snapshot view), then click the Record a Tour icon in the upper part of the main Google Earth window.
- In the tour recording area at lower left, click the record button to start recording the movements of your tour, then the audio button to start recording your audio narrative (see here for more information on narrated tours).
- Present an overview of your tour while you’re in snapshot view.
- Now you will click on each placemark, narrating the tour as you go. Start by (i) double-clicking to left of the placemark in the Places window to fly to the location, then (ii) click the placemark title to display the InfoWindow; finally, (iii) click to dismiss the InfoWindow. If your placemarks are in order, you’ll simply move down the folder, following this procedure once for each placemark, and pausing as long as you need to narrate the location. (Note: these steps could be automated by playing a tour for the folder, then saving the tour; but you cannot record audio.)
- When you’ve finished all placemarks, double-click on the enclosing folder to go back to the snapshot view. You can then complete your tour with this same view.
-
- When you end the tour, it will automatically replay. Feel free to re-record the tour if necessary by starting again (and note below how to fix a truncated tour; you won’t need to re-record). When you are satisfied with your tour:
- Click the save button on the tour playing area and give it a name and description, if desired. It will be saved in your enclosing folder; it’s handy to drag it to the top of the folder so it can be readily found and played. Make sure you have just one tour in this folder.
- Important! Select the entire enclosing folder, then right-click and choose “Save Place as….” If you’ve recorded an audio narrative and want to share it with others, you must save the tour as a KMZ, not a KML! Otherwise, a KML is fine.

Tour miscellany
The basic procedure above is illustrated in this Google Earth tour you can download and play. Here are a few extra points:
- Sometimes you will want to (or need to) edit elements of your tour KMZ. To do this, you’ll need to unzip the KMZ (method differs depending on your OS). You’ll see doc.kml, a files folder, and your audio inside the files folder. Edit the desired file as per below, then click on the individual components (not the enclosing folder) and rezip into a new KMZ file. Here are some examples:
- Google Earth has a nasty habit of cutting off the last few seconds of your tour. It turns out that your audio file is fine; it’s just that certain KML code is at fault. Find the very last instance of Wait in doc.kml and add ten seconds to it; this usually does the trick.
- Some PCs save Google Earth audio files in a format that can’t be played on other computers. You can, however, convert the format of your audio narrative file to a better format (e.g., .m4a), and edit the SoundCue file extension in doc.kml accordingly.
- You may want to add some extra tour functionality that you can’t add via the Google Earth tour recorder; see the Touring in KML page for options such as pausing, toggling description balloons, or adding historical imagery.
- If you are recording a route-based tour, select the path, then click Play Tour at the bottom right of the Places window. (This is the same you’d do if you wanted to automatically play a tour based on your folder items.) When it’s done playing, you have the option to save it as above (but not to record audio). The Play Tour feature builds on settings under Preferences > Touring, so feel free to make adjustments as desired.
- While at any location, you may manually zoom, pan, and navigate around the location and your motion will be recorded with the tour.
- You can also record a tour while another tour is playing to create a new tour with added effects; see here for info.
- The base image for your tour is the default Google image, but if you’d like you could georeference another image (e.g., an historical map) and overlay it as the base image. See here for help on georeferencing in Google Earth, then simply make sure this georeferenced image overlay is in the same enclosing folder as your other tour resources. (Note from this help page that you can also create a photo overlay placemark which could be added as a resource to your tour.)
Sharing your tour
You can always share your tour KML or KMZ for others to run on Google Earth. The tour would be viewable on both mobile and desktop Google Earth, although mobile viewing does not include audio. Another way to share a set of tours (e.g., all student tours in a course project) is via our GeoServer site as a network link; please contact us if interested.
Embedding your Google Earth tour on your DS site, as seen in this post, is nice because viewers don’t have to download files or run Google Earth (though they do need the Google Earth plugin on their browser). We now have a simple shortcode you can use to do this! Here’s how:
- Upload your tour file to your DS site media library, and copy the URL path to the file.
- Make sure you’ve activated the Google Earth Tours Embed plugin.
- Create a new page, and enter this shortcode (replacing squiggly brackets with square brackets!): {gearthtour file="FullPathToFile" height="HeightInPixels" width="WidthInPixels" title="Title"}. Then save your page and you’re done!
For instance, the shortcode for the embedded tour linked above is {gearthtour file="https://ds.lclark.edu/demo/wp-content/uploads/sites/7/2014/07/TokyoTestTour10.kmz" height="600px" width="900px" title="Title Goes Here"}.
Note that the Google Earth plugin has occasional minor issues on browsers; we’ve found Chrome or Firefox to work best so far for viewing.