Flickr is self-described as “almost certainly the best online photo management and sharing application in the world.” We recommend Flickr as a good way to manage and share your photos online, especially if they are part of a project you are documenting on this DS multisite, as you can organize and display them in far more ways than images you store in your site’s media library. Your free Flickr (actually, Yahoo) account gives you 1000 GB storage and free mobile apps to upload, view, and manage your photos. This page covers Flickr basics, using the Flickr device app, embedding Flickr images on your site, and developing a Flickr-based Google Earth photo tour.
Flickr basics
Flickr is an online service, available via flickr.com. Here are some basics:
- First, you will need to get a Flickr account (unless your instructor has given you login information for a shared Flickr account).
- Next step is to upload images.
- If you took photos on a mobile device and uploaded them, they will show up in your photostream.
- To upload other images from your computer or camera, click Upload and just drag and drop images into the window.
- If you use iPhoto, here is a simple way to sync with Flickr automatically.
- Now, all of the photos you upload will become part of your photostream, which you can organize into albums. You can do this by going to Albums > Add New Album and just drag/drop the images you want into the album. If you are using a shared Flickr account, your instructor has typically defined an album you should use.
- If you are using a normal camera vs. the Flickr device, your photos will not be geotagged. Geotagging can be a very useful feature for viewing your photos on a map and making photo tours. which you may want for future use. Go to You > Map and simply drag the picture from the bottom bar onto the location where is was taken.
- You can readily delete duplicate or unwanted photos from your photostream, rearrange photos on albums, etc. See here for some general Flickr help on these and other common functions.
The Flickr app

Click image to expand
You can download the free Flickr app here. Then press Get Started and enter your Flickr (Yahoo) account information. Next, check the settings by clicking the profile button in the bottom right corner, then the gear symbol in the top left corner.
- Important!: Turn off Auto Sync, unless you really want every photo you take on your device to be synced to Flickr.
- You may want to keep Save to Camera Roll on so that you can access Flickr photos from other photo apps as well.
- If you ever need to sign out (e.g., to switch accounts), you’ll find the button at bottom.
- One important setting is geotagging, which Flickr will ask you to approve when you first launch the app. To verify on an iOS device, go to Settings > Privacy > Location Services and verify that Flickr is set to On.
From your profile page, you can also search and view notifications. If you need to edit the privacy of photos or albums you have already posted, select Edit. Select the photo and click the button in the left corner to change photo privacy or delete it.
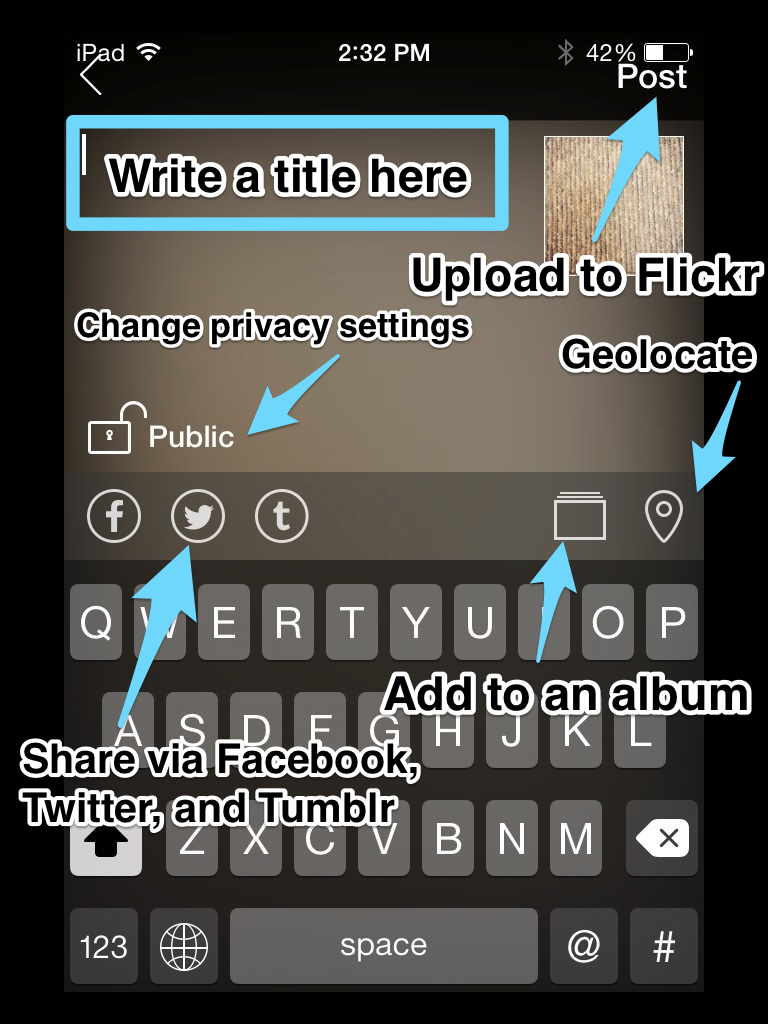
To take a picture or upload one from your camera roll, press the middle camera button. To choose one from your camera roll, press the bottom left button or press the middle shutter button. Once you have a picture, you have the option of editing it. You can choose (ordered left-right on the window) auto correct the color, crop, choose a filter, change brightness/contrast, change color balance, play with levels, and sharpen.
Click image to expand
Once you are done click Next and make sure to do these things:
- Add a brief title for the picture, which will appear as a caption when you display it
- Assign the photo to an album, to keep your photostream organized (especially if it’s a shared Flickr account!)
- Optionally, you may share the image via social media, change its privacy, and assign it to a known location (it will automatically be geotagged if you followed the instructions above)
You will then press Post and the photo will upload to your Flickr.
Embedding Flickr images on your DS site
You can readily share any single Flickr image on a post or page on your DS site by simply pasting the URL to that image on its own line, as Flickr is a supported WordPress embed. Additionally, you may want to display multiple images on your site via either a photo slider (showing one image at a time in a slideshow) or a gallery (showing all your images at once in a tile layout). We support two slider plugins: RoyalSlider is best, but use SlideDeck2 if you want to display full image descriptions or show a tagged subset of your photostream. We recommend one gallery plugin: Awesome Flickr Gallery. These plugins require your Flickr user ID and usually a Flickr API key, so you may want to get those in advance. For instructions on how to display Flickr images on a RoyalSlider please visit the Image Displays help page. Below you will find instructions for the Awesome Flickr Gallery plugin.
Making a Flickr gallery
- First, activate Awesome Flickr Gallery by going to Plugins and search Awesome Flickr. Click Activate. Now you will see Awesome Flickr Gallery show up on your Dashboard.
- Navigate to Default Settings and enter your Flickr User ID and Flickr API Key. Then change the Default Settings as you wish and Save any changes.
- Next, go to Add Gallery and fill in the blanks. You may choose which images are in the gallery by picking the Gallery Source. If your images are grouped in an album in Flickr, choose Photoset and choose the album. If your photos are in many different albums in Flickr, you may tag them in Flickr and choose Tags.
- Once you are done, click Add Gallery. You will be given a piece of shortcode which you will paste into the post or page on a new line where you want the gallery.
Flickr Photo Tour
If you are in the field using Flickr with a mobile device, the application geolocates each picture. This allows you to create a Google Earth Flickr photo tour by placing all images in a Flickr album and accessing the album as a KML. The workflow is found below.
- Using your mobile device, shoot and upload photos to a Flickr album with a brief caption as the title. You may wish to edit your Flickr album on your computer browser, deleting unwanted photos, adding fuller
descriptions for each image as desired (images have both title and description field). - Convert your Flickr album to a KML file using this site (note that it won’t convert Flickr images that are not geotagged). You simply enter the set (album) number at top: the album number is a portion of the album URL, as shown on the conversion site. When submitting the query to access the KML, we recommend small or medium photo size; the other default settings are okay.
- Open this KML file in Google Earth on your computer. You will notice that you now have a placemark for each geolocated photo, with the photo and caption/description appearing in the placemark info window. Edit/hide placemarks as desired, then follow the Record a Tour instructions found on the tour help page, optionally including an audio narrative. Yours will be a location-based tour, as noted in #3 on the help page.